The ancient Romans are often credited with pioneering one of the earliest forms of underfloor heating through their hypocaust systems, which used hot air and smoke to warm baths and private homes. This revolutionary concept, though rudimentary, laid the foundation for the sophisticated electric underfloor heating installations we use today. Electric underfloor heating offers a practical, efficient and discreet solution for both residential and commercial spaces.
In this comprehensive guide, we will walk you through everything you need to know about installing electric underfloor heating, from understanding the benefits to choosing the right system and ensuring a successful, safe installation.
Are you looking to install electric underfloor heating? Take a look at Paine Manwaring’s electrical services and see how we can make your installation seamless and hassle-free.
Understanding Electric Underfloor Heating
Electric underfloor heating is a practical and efficient solution for modern commercial and residential spaces. It works by distributing heat evenly beneath the floor surface, creating a comfortable environment without the need for visible radiators or ducting. Ideal for refurbishments or new builds, it offers flexibility in both design and application.
Benefits of Electric Underfloor Heating
Electric underfloor heating installation offers numerous advantages over traditional radiator systems, making it an ideal choice for both residential and commercial spaces. Here are the key benefits:
- Consistency – Delivers even heat across the floor, avoiding cold spots and reducing heat loss through walls and ceilings.
- Efficiency – Operates at lower temperatures while maintaining comfort, supporting reduced energy consumption.
- Responsiveness – Heats up quickly and integrates with programmable or smart thermostats for precise control.
- Versatility – Ideal for use with tiled floors in bathrooms, kitchens and conservatories, and can also be used with low-pile carpet or specially designed underfloor heating carpets.
- Practicality – Well-suited to refurbishments or extensions where connecting to central heating is challenging.
- Discretion – Removes the need for visible radiators, supporting minimalist and open-plan designs.
Types of Electric Underfloor Heating Systems
When considering electric underfloor heating installation, it’s important to choose the right system based on your room size, flooring material and installation preferences. The main types of electric underfloor heating systems include heating mats, heating cable systems and foil heating systems.
- Heating Mats consist of pre-spaced heating cables fixed to a mesh backing, making them ideal for regular-shaped rooms with tile or stone floors. They are easy to install and well suited to areas that require consistent heat distribution.
- Heating Cable Systems are flexible and involve manually laying out individual heating cables. This system is best for irregularly shaped rooms or areas with obstacles, offering greater design flexibility.
- Foil Heating Systems feature thin heating cables embedded in a foil layer, making them ideal for low-profile installations under wood, carpet and vinyl or laminate floors. These systems are especially suitable for retrofit projects where maintaining floor height is crucial.
Preparation Before Installation
Proper preparation is key to ensuring the success and longevity of your electric underfloor heating installation. Before starting, it’s essential to assess your subfloor, gather the necessary tools and materials and take appropriate safety precautions.
Assessing Your Subfloor
The subfloor is the surface beneath your heating system, which must be clean, dry and level for optimal performance. Check for any cracks, jagged edges, splinters, moisture or debris that could interfere with the system’s functionality. If the subfloor is uneven, it may require levelling before proceeding. For optimal results, make sure the surface is free of dust and dirt.
Necessary Tools and Materials
To install electric underfloor heating, you will need a few basic tools and materials, depending on the type of system you have chosen. These include:
Tools:
- Tape Measure for accurate measurements of the area where you’ll lay the matting or cables.
- Utility Knife to cut insulation boards and heating mats to fit the installation area.
- Wire Cutters and Wire Strippers to trim and strip the ends of electrical wires.
- Spirit Level to ensure that the mats, cables or foil are installed evenly for consistent heat distribution.
- Cable Tester to check the integrity of the wiring before activating the system.
Materials:
- Heating Mats, Cables or Foil, which are the core components of the system.
- Joint Tape for connecting sheets of matting or foil together where necessary.
- Adhesive to secure the matting (if not using self-adhesive) to the subfloor.
- Insulation Boards to enhance energy efficiency and direct heat upwards.
- Floor Finish, such as tiles, vinyl, laminate or other flooring materials, to complete the installation.
Safety Precautions
Safety is paramount when installing an electric underfloor heating system. Always switch off the power supply before beginning any work and follow the manufacturer’s instructions carefully. Use insulated tools to prevent electrical shocks and ensure the system is correctly earthed. It is strongly recommended to work with a qualified electrician for any electrical connections to avoid potential wiring issues and ensure the system is safely and correctly installed. A professional can also verify that the installation meets local regulations and safety standards.
Step-by-Step Installation Guide
Installing an electric underfloor heating system is a straightforward process when following the correct steps. This guide will walk you through the essential stages, from laying the insulation boards to testing the system, ensuring a smooth installation.
Step 1: Laying Insulation Boards
Before you begin installing the heating mats, cables or foil, it’s essential to lay down insulation boards on your subfloor. These boards are designed to direct the heat upwards, improving energy efficiency and reducing heat loss through the floor. Cut the boards to fit the room and lay them down securely, ensuring there are no gaps between the edges. Properly laying insulation will ensure optimal performance of your electric underfloor heating system.
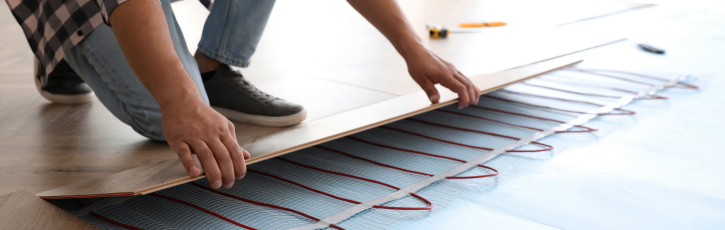
Step 2: Installing the Heating Mats, Cables or Foil
Now it’s time to install the heating mats, cables or foil. For heating mats, simply roll them out across the floor, ensuring they fit the area. For loose cables, manually lay them in parallel rows, leaving space for any obstacles such as pipes or fixed furniture. When working around obstacles, ensure the cables do not overlap or become too crowded, as this could cause overheating. Allow sufficient space around the edges to avoid damage during installation.
If you’re using foil heating, this thin, flexible system is laid directly over insulation boards and should be kept smooth and flat. The foil mats are typically secured in place using aluminium or cloth tape, not adhesive. This ensures stability during floor installation without affecting heat transfer.
At this stage, a qualified electrician should take over to handle any electrical connections and ensure the system is properly wired.
Step 3: Connecting the Thermostat
Once the electric underfloor heating system is installed, the next stage is to connect the thermostat. This device is essential for regulating heat output and ensuring the system operates efficiently. The thermostat should be positioned on an internal wall, away from windows or direct heat sources, to provide accurate temperature readings. It connects to the heating system and a floor temperature sensor, which is typically installed within a protective conduit beneath the floor surface.
Your electrician will ensure that all electrical connections, including wiring the thermostat and integrating the system into the mains supply, complies with current UK electrical regulations. They will also ensure the use of an appropriate RCD (residual current device) and verify the earthing and circuit protection. This step is critical for both safety and warranty compliance.
Step 4: Testing the System
It’s best practice to test the underfloor heating system before applying the final floor covering. Your electrician will check all wiring connections and ensure the thermostat is properly configured. Using a multimeter, they’ll measure the resistance of the heating foils, cables or mats to confirm they are functioning correctly.
Turning the system on and monitoring for at least an hour ensures even heat distribution and correct thermostat response.
It’s highly recommended to have a qualified electrician perform this test to ensure compliance with safety standards and avoid potential issues down the line.
Step 5: Cover and Finish
Once the heating system is in place and tested, you can move on to the final step: covering the heating mats, cables or foil. Apply a layer of flexible tile adhesive or self-levelling screed over the system to secure it in place – this is essential for mat and cable systems. Allow the screed or adhesive to cure for the recommended time to ensure proper bonding.
Note that foil systems should not be covered with adhesive or screed and are instead installed dry beneath compatible floating floor finishes like laminate wood.
After curing, you can install your final floor covering. This may include tiles, laminate, vinyl or carpet, as long as the material is compatible with electric underfloor heating. Always follow the manufacturer’s guidelines for flooring and underlay installation to prevent any damage to the system and to ensure it performs efficiently.
Expert Insight: Post-Installation Considerations
System Maintenance Tips
At Paine Manwaring, we recommend a few simple steps to ensure your electric underfloor heating system continues to perform effectively long after installation:
- Regular inspections: Periodically check for any signs of wear or damage to the cables and floor covering.
- Thermostat settings: Regularly verify that the thermostat is properly calibrated and working to control the temperature as needed.
- Avoid heavy furniture: Never place heavy items directly over the heating mats, as this could damage the system.
- Cleaning: Keep the floor clean using gentle methods, avoiding harsh chemicals that could interfere with the system’s performance.
We also suggest having a professional inspection every few years to ensure everything is functioning optimally and to address any potential issues before they escalate.
Ready to Install Electric Underfloor Heating?
Whether you’re embarking on a new build, renovation or retrofitting, the right preparation and careful installation are key to achieving optimal performance of your electric underfloor heating system.
If you’re ready to move forward with your project, Paine Manwaring offers expert electrical services to ensure a safe, efficient and hassle-free installation. Reach out to us today and let us help turn your underfloor heating vision into reality.
Electric Underfloor Heating Installation FAQS
Can I install electric underfloor heating myself?
While it’s possible for a DIY enthusiast to install electric underfloor heating, it’s highly recommended to work with a qualified electrician for the electrical connections. Handling the wiring and ensuring the system meets local safety standards is crucial for both performance and safety.
Can electric underfloor heating be used with all types of flooring?
Electric underfloor heating is compatible with a variety of floor coverings, including tiles, vinyl and laminate. However, it’s important to check manufacturer guidelines, especially when using carpets. Low-pile carpets or carpets specifically designed for underfloor heating are the best options.
How long does electric underfloor heating take to install?
The installation time for electric underfloor heating varies depending on room size and complexity. This impacts time taken to lay insulation boards, install heating mats, cables or foil and to connect the system. Final floor covering installation will take additional time as adhesive or screed must cure.
Paine Manwaring is an established, professional and highly experienced supplier of plumbing, heating and electrical services to domestic and commercial customers throughout Sussex, Surrey and Hampshire.
For more information about our heating, plumbing and electrical services which we provide for both homes and businesses, get in touch with a member of our expert and friendly team today on 01903 237522 or enquiries@painemanwaring.co.uk (Worthing) or 01243 784711 or info@painemanwaring.co.uk (Chichester).